A few weeks ago, there was a Dell blog post that provided an example of how to integrate Dell’s blade server platform running Dell’s SmartFabric Services with Cisco’s Application Centric Infrastructure (ACI.) Here are some of the key takeaways from that blog post.
Configuration Requirements
In the blog post, the configuration of the Dell SmartFabric on the Dell PowerEdge MX blade infrastructure (MX7000) with Cisco ACI makes the following assumptions:
- All MX7000 chassis and management modules are cabled correctly and in an MCM group.
- VLTi cables between MX Fabric Switching Engines (FSE) and Fabric Expander Modules (FEM) are connected correctly.
- PowerEdge and Cisco ACI platforms are in healthy status and are running updated software.
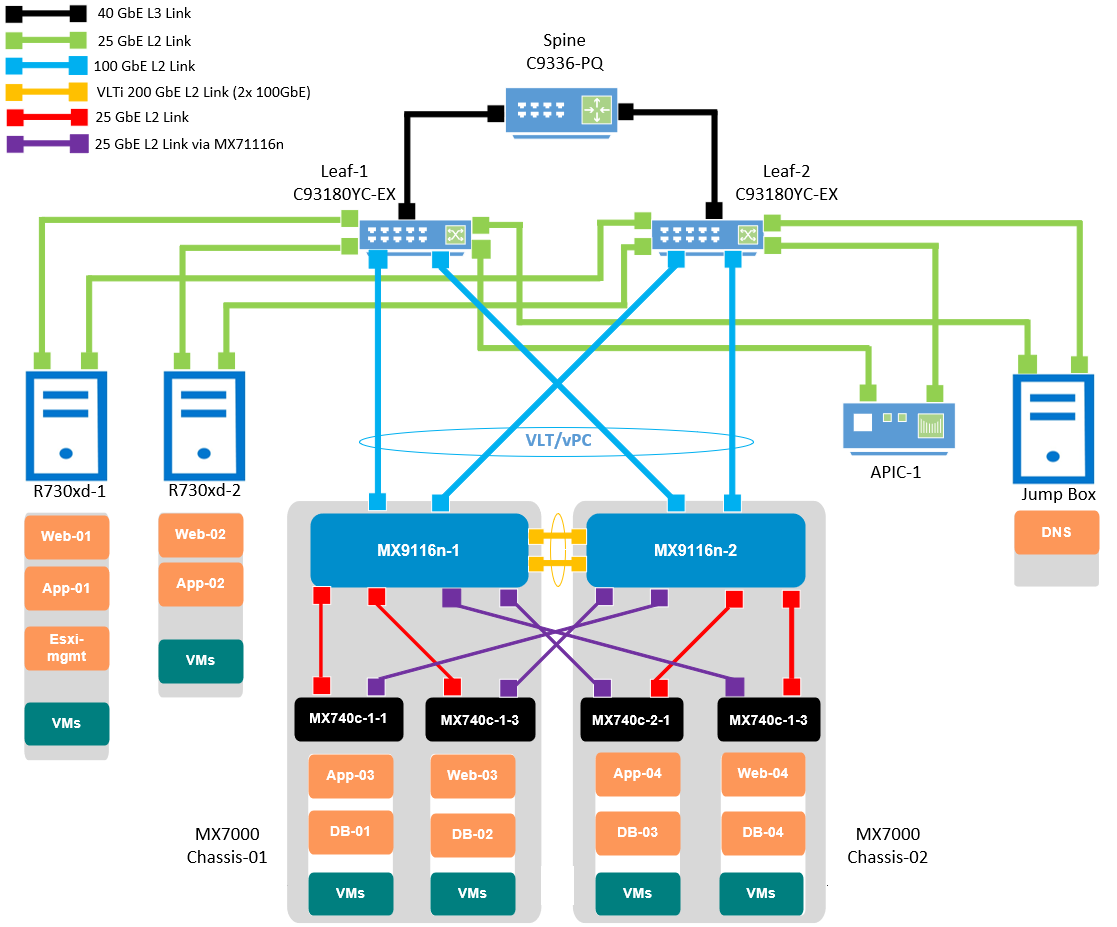
Topology
Per the blog post, the validated Cisco ACI environment includes a pair of Nexus C93180YC-EX switches as leafs. These switches are connected to a single Nexus C9336-PQ switch as the spine using 40GbE connections. MX9116n FSE switches are connected to the C93180YC-EX leafs using 100GbE cables.
Cisco APIC Steps
There were 13 steps taken in the Fabric tab of the Cisco APIC Controller:
- Create VLAN Pool
- Create Physical Domain
- Create Attachable Access Entity Profile
- Create Port-Channel Policy
- Creat STP Interface Policy
- Create LLDP Interface Policy
- Create Miscabling Protocol Policy
- Crate vPC Policy Group
- Create Leaf Access Port Policy Group
- Create Leaf Interface Profile
- Create vPC Domain Policy
- Create vPC Explicit Protection Group
- Create Leaf Profile
Next, there were 5 steps taken in the Tenant tab of the Cisco APIC Controller:
- Create Tenant
- Create VRF
- Create Bridge Domain
- Create Application Profile
- Create EPGs.
Then, there was 1 step taken in the Fabric tab of the Cisco APIC Controller:
- Configure AEP with EPG & VLANs
Then, there was 1 step taken in the Virtual Networking tab of the Cisco APIC Controller:
- Create vCenter Domain
Lastly, there were 3 final steps taken in the Tenant tab of the Cisco APIC Controller:
- Create Contract Filter
- Create Contract
- Apply Contracts to VRF
(For specific details in what each of these are, refer to the original blog post.)
Configure Dell OpenManage Enterprise-Modular (OME-M)
In the next section of the blog post, the PowerEdge MX management platform is configured with the following steps:
- on the Home tab of the OME-M, create MCM group.
- on the Configuration tab of OME-M, define VLANs.
- on the Devices tab of OME-M, create SmartFabric then Create uplinks
- on the Configuration tab of OME-M, create server template, add VLANs to server template then deploy server template.
(For specific details in what each of these are, refer to the original blog post.)
Configure VMware vCenter
Within VMware vCenter, go to the Hosts and Clusters tab, do the following:
- create Data Center
- Create Cluster
- Add a Host
- Create VMs
Next, go to the Networking tab and create vDS as well as set up the networking.
(For specific details in what each of these are, refer to the original blog post.)
Wrap-Up
The blog post discusses some additional options, like an add-in to VMware vCenter that is designed to complement SmartFabric Services, so I encourage you to read the full blog post for complete details.
 Kevin Houston is the founder of BladesMadeSimple.com. With over 26 years of experience in the x86 server marketplace Kevin has a vast array of competitive x86 server knowledge and certifications as well as an in-depth understanding of VMware virtualization. He has worked at Dell Technologies since August 2011 and is a Principal Engineer supporting the Northeast Enterprise Region and is also a CTO Ambassador for the Office of the CTO at Dell Technologies.
#IWork4Dell
Disclaimer: The views presented in this blog are personal views and may or may not reflect any of the contributors’ employer’s positions. Furthermore, the content is not reviewed, approved or published by any employer. No compensation has been provided for any part of this blog.